

KSD301 10A 250V Thermostat Sensor (90C Normally Close )
Original price was: 25.00 EGP.20.00 EGPCurrent price is: 20.00 EGP.
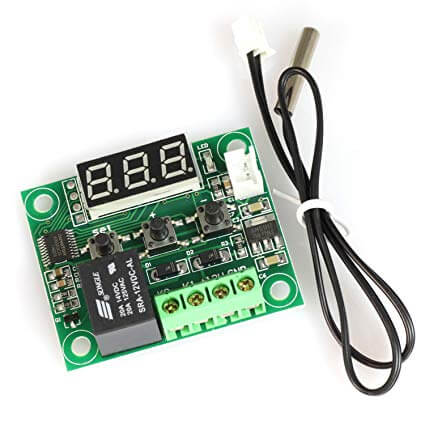
XH W1209 12V Digital Temperature Controller Module W/ Display and NTC Temp Sensor
| Quantity | Discount (%) | Price |
|---|---|---|
| 1 - 19 | — | 75.00 EGP |
| 20 - 49 | 4 % | 72.00 EGP |
| 50+ | 9.33 % | 68.00 EGP |
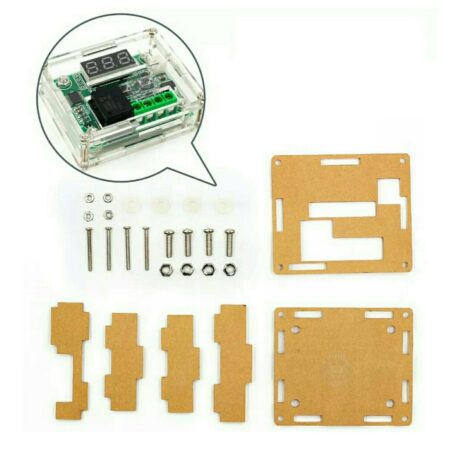
XH W1209 12V Digital Temperature Controller Module W/ Display and NTC Temp Sensor
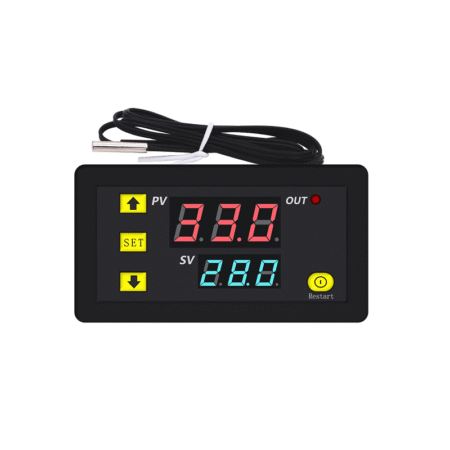
This is XH W1209 12V Digital Temperature Controller Module W/ Display and NTC Temp Sensor.
W1209 Mini thermostat Temperature controller is low-cost 12V Temperature controller with 7-segment display and 3 switch keypad for setting temperature and other parameters. The module features an NTC thermistor temperature sensing and has an accuracy of 0.1 C.
The XH W1209 digital temperature controller Module W/ Display and NTC Waterproof Temperature Sensor is an incredibly low cost yet highly functional thermostat controller. With this module, you can intelligently control power to most types of electrical devices based on the temperature sensed by the included high accuracy NTC temperature sensor.
We can display the current temperature in degrees Centigrade via its 3 digits seven-segment display and the current relay state by an onboard LED.
The thermostat will display the current temperature in °C by default. When in any other mode making no input for approximately 5 seconds will cause the thermostat to return to this default display.
To set the trigger temperature press the button marked ‘SET’. The seven-segment display will flash. You can now set a trigger temperature (in °C) using the ‘+’ and ‘-‘ buttons in 0.1° increments. If we didn’t press any buttons for approximately 2 seconds the trigger temperature will be store and the display will return back to the current temperature.
To set any parameter first long press the ‘SET’ button for at least 5 seconds. The seven-segment display should now display ‘P0’. This represents parameter P0. Pressing the ‘+’ or ‘-‘ buttons will cycle through the various parameters (P0 to P6). Pressing the ‘SET’ button whilst any of these parameters are displayed will allow you to change the value for that parameter using the ‘+’ and ‘-‘ buttons. When finished setting a parameter press the set button to exit that option. If no buttons are pressed for approximately 5 seconds the thermostat will exit the parameter options and will return back to the default temperature display.
The parameter P0 has two settings, C and H. When setting to C (default) the relay will energize when the temperature is reached. Use this setting if connecting to an air-conditioning system. When set to H the relay will de-energize when the temperature is reached. Use this setting if controlling a heating device.
This sets how much change in temperature must occur before the relay will change state. For example, if set to the default 2oC and the trigger temperature has been set to 25oC, it will not de-energize until the temperature falls back below 23oC. Setting this hysteresis helps stop the thermostat from continually triggering when the temperature drifts around the trip temperature.
This parameter limits the maximum trigger temperature that can be set. It is useful as a safety to stop an excessively high trigger temperature from accidentally being set by the user.
This parameter limits the minimum trigger temperature that can be set. It is useful as a safety to stop an excessively low trigger temperature from accidentally being set by the user.
Should you find there is a difference between the displayed temperature and the actual temperature; (for instance, if the temperature probe is on a long run of cable) you can make minor corrections to the temperature reading with this parameter.
To reach trigger temperature this parameter allows for delaying switching of the relay. The parameter can be set in one-minute increments up to a maximum of 10 minutes.
Setting a value for this parameter will cause the relay to switch off when the temperature reaches this setting. The seven-segment display will also show ‘—‘ to indicate an alarm condition. The relay will not re-energize until the temperature falls below this value. The default setting is OFF.
Note: The 12v relay module may differ in the manufacturer’s name & type from the image.
Long press the “SET” button to activate the menu.
(SET THE VALUES AS MENTIONED IN BRACKET)
Code Description Range Default Value
P0 Heat C/H (C)
P1 Backlash Set 0.1-15 (2)
P2 Upper Limit 110 (110)
P3 Lower Limit -39 (-39)
P4 Correction -7.0 ~ (0)
P5 Delay Start Time 0-10 mins (0)
P6 High-Temperature Alarm 0-110 (OFF)
Long pressing “+/-” will reset all values to their default
1 x W1209 digital temperature controller switch with Temperature sensor and display
| Model Type | Temperature Controller |
|---|---|
| Voltage Rating (VDC): | 12 |
| Model No.: | XH W1209 |
| Accuracy | ± 0.1°C |
| Refresh Rate | 0.5 Sec |
| Measuring inputs | NTC10K |
| Cable Length (cm): | 50 |
| Output Type | 1 Channel Relay Output |
| Max Capacity: | 10A |
| Length (mm): | 48 |
| Width (mm): | 40 |
| Height (mm): | 14 |
| Weight (g): | 20 |
| Shipping Weight | 0.022 kg |
| Shipping Dimensions | 5 × 3 × 1 cm |
هذه هي وحدة التحكم الرقمي في درجة الحرارة XH W1209 بجهد 12 فولت، مزودة بشاشة عرض ومستشعر حرارة NTC.
يُعد متحكم الحرارة المصغر W1209 وحدة منخفضة التكلفة تعمل بجهد 12 فولت، وتحتوي على شاشة رقمية 7-Segment وثلاثة أزرار لضبط درجة الحرارة وباقي الإعدادات. تعتمد الوحدة على مستشعر حراري NTC لقياس درجة الحرارة، وتوفر دقة قياس تصل إلى 0.1 درجة مئوية.
تُعتبر وحدة XH W1209 الرقمية للتحكم في الحرارة مع الشاشة ومستشعر الحرارة المقاوم للماء من نوع NTC من الوحدات الاقتصادية جدًا وفي نفس الوقت ذات وظائف عملية ممتازة. باستخدام هذه الوحدة يمكنك التحكم بذكاء في تشغيل أو فصل الطاقة عن العديد من الأجهزة الكهربائية بناءً على درجة الحرارة التي يقرأها المستشعر المرفق عالي الدقة.
يمكن عرض درجة الحرارة الحالية بالدرجة المئوية من خلال شاشة العرض المكونة من 3 أرقام 7-Segment، كما يمكن معرفة حالة الريليه الحالية بواسطة مؤشر LED موجود على اللوحة.
يعرض الترموستات درجة الحرارة الحالية بالدرجة المئوية °C بشكل افتراضي.
وعند الدخول إلى أي وضع آخر، إذا لم يتم الضغط على أي زر لمدة تقارب 5 ثوانٍ، فسيعود الجهاز تلقائيًا إلى عرض درجة الحرارة الحالية.
لضبط درجة حرارة التشغيل، اضغط على الزر المكتوب عليه SET.
ستبدأ شاشة العرض في الوميض، ويمكنك الآن ضبط درجة حرارة التفعيل بالدرجة المئوية باستخدام زري + و – بزيادة أو نقصان 0.1 درجة في كل مرة.
إذا لم يتم الضغط على أي زر لمدة تقارب ثانيتين، سيتم حفظ درجة الحرارة المضبوطة وتعود الشاشة إلى عرض درجة الحرارة الحالية.
لضبط أي بارامتر، اضغط مطولًا على زر SET لمدة لا تقل عن 5 ثوانٍ.
ستعرض الشاشة الرمز P0، وهو يمثل أول بارامتر.
يمكنك استخدام زري + و – للتنقل بين البارامترات المختلفة من P0 إلى P6.
وعند الضغط على زر SET أثناء عرض أي بارامتر، يمكنك تعديل قيمته باستخدام زري + و –.
بعد الانتهاء من ضبط البارامتر، اضغط على زر SET للخروج من هذا الخيار.
إذا لم يتم الضغط على أي زر لمدة تقارب 5 ثوانٍ، فستخرج الوحدة من قائمة الإعدادات وتعود إلى عرض درجة الحرارة الحالية.
يحتوي البارامتر P0 على وضعين:
عند ضبطه على C (الإعداد الافتراضي)، يتم تفعيل الريليه عند الوصول إلى درجة الحرارة المحددة. ويُستخدم هذا الوضع عند توصيل الوحدة بنظام تبريد أو تكييف.
أما عند ضبطه على H، يتم فصل الريليه عند الوصول إلى درجة الحرارة المحددة. ويُستخدم هذا الوضع عند التحكم في جهاز تسخين.
يحدد هذا البارامتر مقدار التغير في درجة الحرارة المطلوب قبل أن يغير الريليه حالته.
على سبيل المثال، إذا تم ضبط هذا البارامتر على القيمة الافتراضية 2°C وكانت درجة التفعيل مضبوطة على 25°C، فلن يتم فصل الريليه إلا عندما تنخفض درجة الحرارة إلى أقل من 23°C.
هذا الإعداد مهم لمنع الترموستات من التفعيل والفصل المتكرر عندما تتذبذب درجة الحرارة حول نقطة التشغيل.
يحدد هذا البارامتر أقصى درجة حرارة يمكن ضبطها كنقطة تشغيل.
وهو مفيد كوسيلة أمان لمنع ضبط درجة حرارة مرتفعة جدًا عن طريق الخطأ.
يحدد هذا البارامتر أقل درجة حرارة يمكن ضبطها كنقطة تشغيل.
وهو مفيد كوسيلة أمان لمنع ضبط درجة حرارة منخفضة جدًا عن طريق الخطأ.
إذا وجدت فرقًا بين درجة الحرارة المعروضة ودرجة الحرارة الفعلية، مثلًا إذا كان مجس الحرارة موصولًا بكابل طويل، فيمكنك استخدام هذا البارامتر لإجراء تصحيح بسيط على القراءة.
يسمح هذا البارامتر بتأخير تبديل حالة الريليه بعد الوصول إلى درجة الحرارة المحددة.
يمكن ضبط التأخير بدقيقة واحدة في كل مرة حتى حد أقصى 10 دقائق.
عند ضبط قيمة لهذا البارامتر، سيتم إيقاف الريليه عندما تصل درجة الحرارة إلى هذه القيمة.
كما ستعرض الشاشة الرمز — للإشارة إلى وجود حالة إنذار.
ولن يعود الريليه إلى العمل مرة أخرى حتى تنخفض درجة الحرارة إلى أقل من هذه القيمة.
الإعداد الافتراضي هو OFF.
قد يختلف اسم الشركة المصنعة أو نوع الريليه 12V عن الصورة المعروضة.
اضغط مطولًا على زر SET للدخول إلى القائمة.
(اضبط القيم كما هو موضح بين القوسين)
الضغط المطول على زرَي + / – يعيد جميع القيم إلى إعدادات المصنع الافتراضية.
الداتاشيت: تحميل



Tell us what you are building and we will help you find suitable components, modules, development boards and tools from our available range.